ROUTED TRACK BUILD - Fiorano, Italy Part 1
The layout - length is 12.1 metres on each of the two parallel lanes, and 11.8 metres on the Best Racing Line which meanders between them. Layout dimensions are approximately 4 metres x 1.45 metres.
I have used 9mm MDF for the top, framed by kiln dried 65 x 18 mm pine, which keeps the weight down.
The outer wall will be 6mm MDF, which will a stressed member of the construction, making it all "box section" like a house internal door, with a high strength to weight factor.
.JPG)
Doesn't everyone put some cars on the wood and dream - but this gives you an idea of scale. Actual "parallel" lane width varies from 83mm on some straight sections to 110mm in some corners.
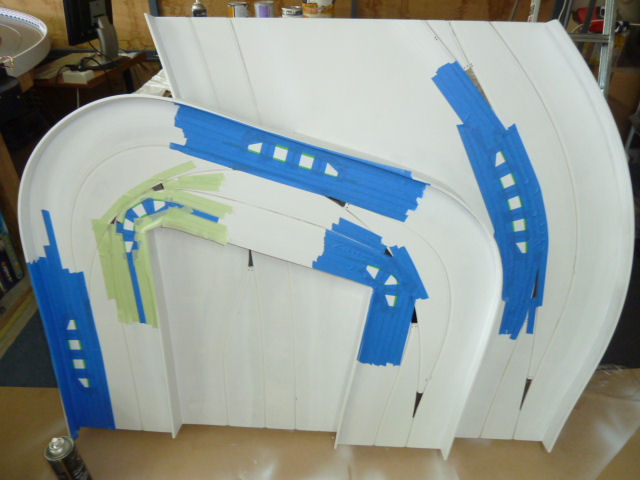
The small grooves cut either side of the lanes are to define and highlight the "rubber stripping" art the sides of the Fiorano circuit in Italy.
.JPG)
Framing Up. I have built the ends first, then I'll tackle the last base level section, leaving the bridge, and vertical and longitudinal alignment section to last. I may need to do some tricks there to make the sections all line up due to the effect of the hill climb section.
.JPG)
.JPG)
.JPG)
Fiorano, Italy Part 2
Most of the framing up is done. A bit of bracing to finish, and some undercuts for the braid I forgot to do before gluing together, but should only take half a day now, to have it ready for painting.
As I started making the frame for adjoining modules, I realised that if I got the levels wrong while screwing and gluing the track sections to the frame, it would be very hard to fix. So I worked on clamping the frame sections that butt against each other, laying the MDF on top, fine adjusting the frame height to get the new track section level with the one it joins to, then clamping the frame sections, drilling and doweling them which is a firm press fit using 12mm dowel, then 10mm holes for bolts with wing-nuts to hold them together as they will sit in the finished track.
Then I could glue and clamp the MDF to the frame.
The glue squeezes out from between the frame and MDF track top, so I used cling-wrap film between the sections to stop them getting glued together. It worked a treat. The cling wrap can be peeled off after the glue cures, and any surface glue can be scraped clear after setting from the facing joints.
.JPG)
In this shot you can see the dowel and bolt/wing-nut connections. I use two or three of each, on each of the modules joins.
.JPG)
A couple of the joins needed encouragement to keep the MDF flush surface all the way across the join, where the elevations changed, so I had to screw through the top as well as glue, and use the screw tension for fine adjustment of height. I only did this where absolutely neccessary for strength and surface alignment, as even well filled screw head holes can move in time, especially as this is a portable track. Mostly, I have a clear surface with no screw fixing from above.
And it all lined up - WHEW. The elevation didn't cause any gaps in the joining of the sections. By doing the bridge, andthen the mid-track hairpin last, I was able to compenate on the fly for any distortion caused by raising up the 2D cut MDF.
.JPG)
Routed Track Build Three - Fiorano, Italy Part III
Painting at last.
Got the thing primed. Brushing into the slots first, then roller over the whole lot. I just couldn't wait for a suitable weather window to spray, and have decided to experiment with using minimal sanding of the primer to retain a rough surface before I top coat with the roller.
If I don't like it, I can still sand that one module, and redo it.
I am hoping to acheive a more textured and less glossy surface finish than I usualy have on my tracks, - apart from the rumble strips which will be hi gloss.
.JPG)
.JPG)
I sprayed the whole rumble strip area around the track with acrylic white gloss (SCA house brand stuff) white.
Left overnight to harden, then masked up.
Sprayed same brand paint in red
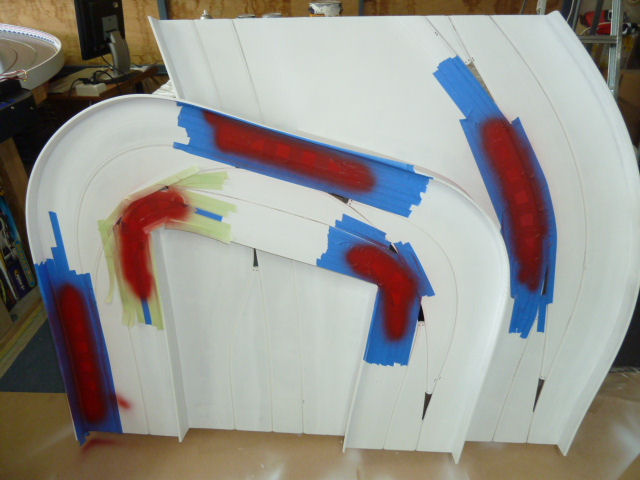
And unmasked, voila, nice clean lines.
.JPG)
The overspray is on areas which will be painted over with dark grey, so the overspray red will disappear.
Masking up the rumble strip.
.JPG)
Then sprayed the masked area with the same white acrylic I used for the rumble-strip. That is to seal the edges of the masking tape. On the first module I didn't seal it enough, and got some bleed. I'll touch that up later. For the 2nd module in the lower picture, I was more thorough with the spray over, and the result was much better, almost perfect.
Then I ran out of my 2nd coat of white acrylic spray paint, so I tried sealing the masking tape with the undercoat . . it worked perfectly. Lesson learned.
This is a different module, I didn't have some stage photos, but you get the idea. Painted the infield and the outer walls.
Now let them dry, and paint the roadway in the middle. There is enough gap between the green infeld and the roadway via the rumble strips that I don't need to mask that side of the masking.
But I will need to mask the side walls, and seals the bottom edge of those with the same grey paint I used for those walls.
Again, this creates a nice clean edge on the masking tape where the wall meets the roadway.
.JPG)
Routed Track Build - Fiorano, Italy Part 3
Catching up with where i actually got to in January before I injured myself.
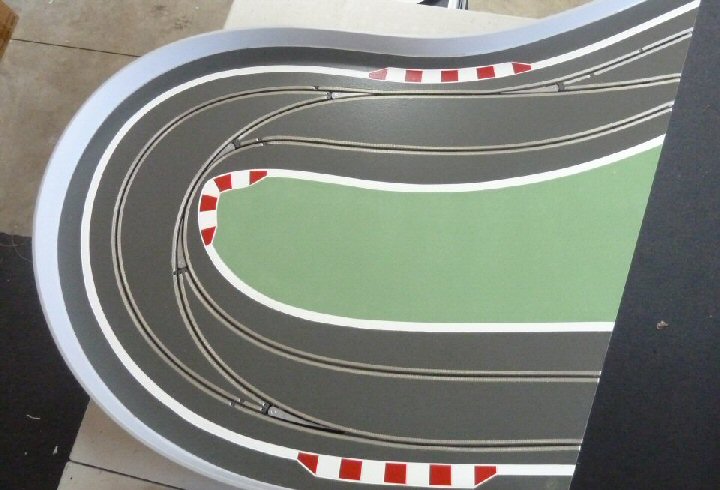
This is the darkest roadway colour I have used on any of my tracks, and I rather like it.
The contrast with the rumble strip and infield "grass" is good to look at.
.JPG)
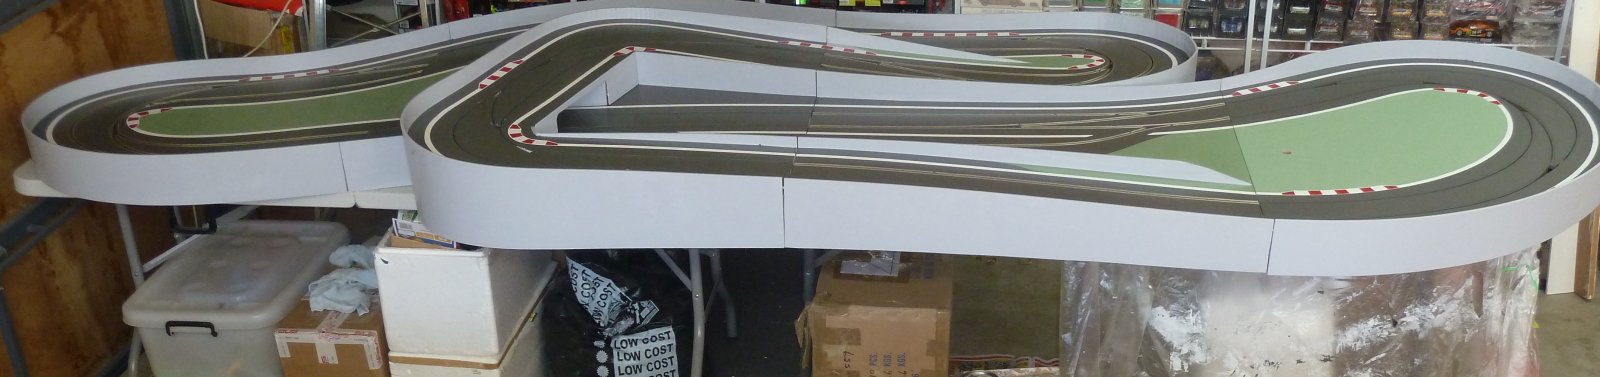
I finally finished putting colour on the boards.
I have clear coat still to do on the foreground module. Then the colour will match the others.
The clear coat is still Cabots “Clear Floor” an acrylic clear coat designed for wooden floors, to take being walked on, day in, day out, so it is tough.
But this time I have used satin finish, over the rough/textured surface I opted for on the road paint.
Two sections braided, the front wall and inside walls of the tunnel still to fit in place, but that’s an easy job for later in the week.
And side on.
So that is "it" for now. It is ready to wire up, but it will be a couple of months at least before I can get myself "rebuilt" and able to continue this article.
Footnote: I spent the next four months bedridden with a hernia doing a basketball impression. By the time I recovered I had lost momentum and this part built track sat under Oakland Raceway for three years before a member of my club bought it off me, completed the wiring and got it running. But I have left the thread up so that people may gain ideas and techniques from it.
Be inspired, it is amazing what even a ham-fisted office boy like me can acheive with a bit of patience, experimentation and help from
those who know better around us.